Introduction
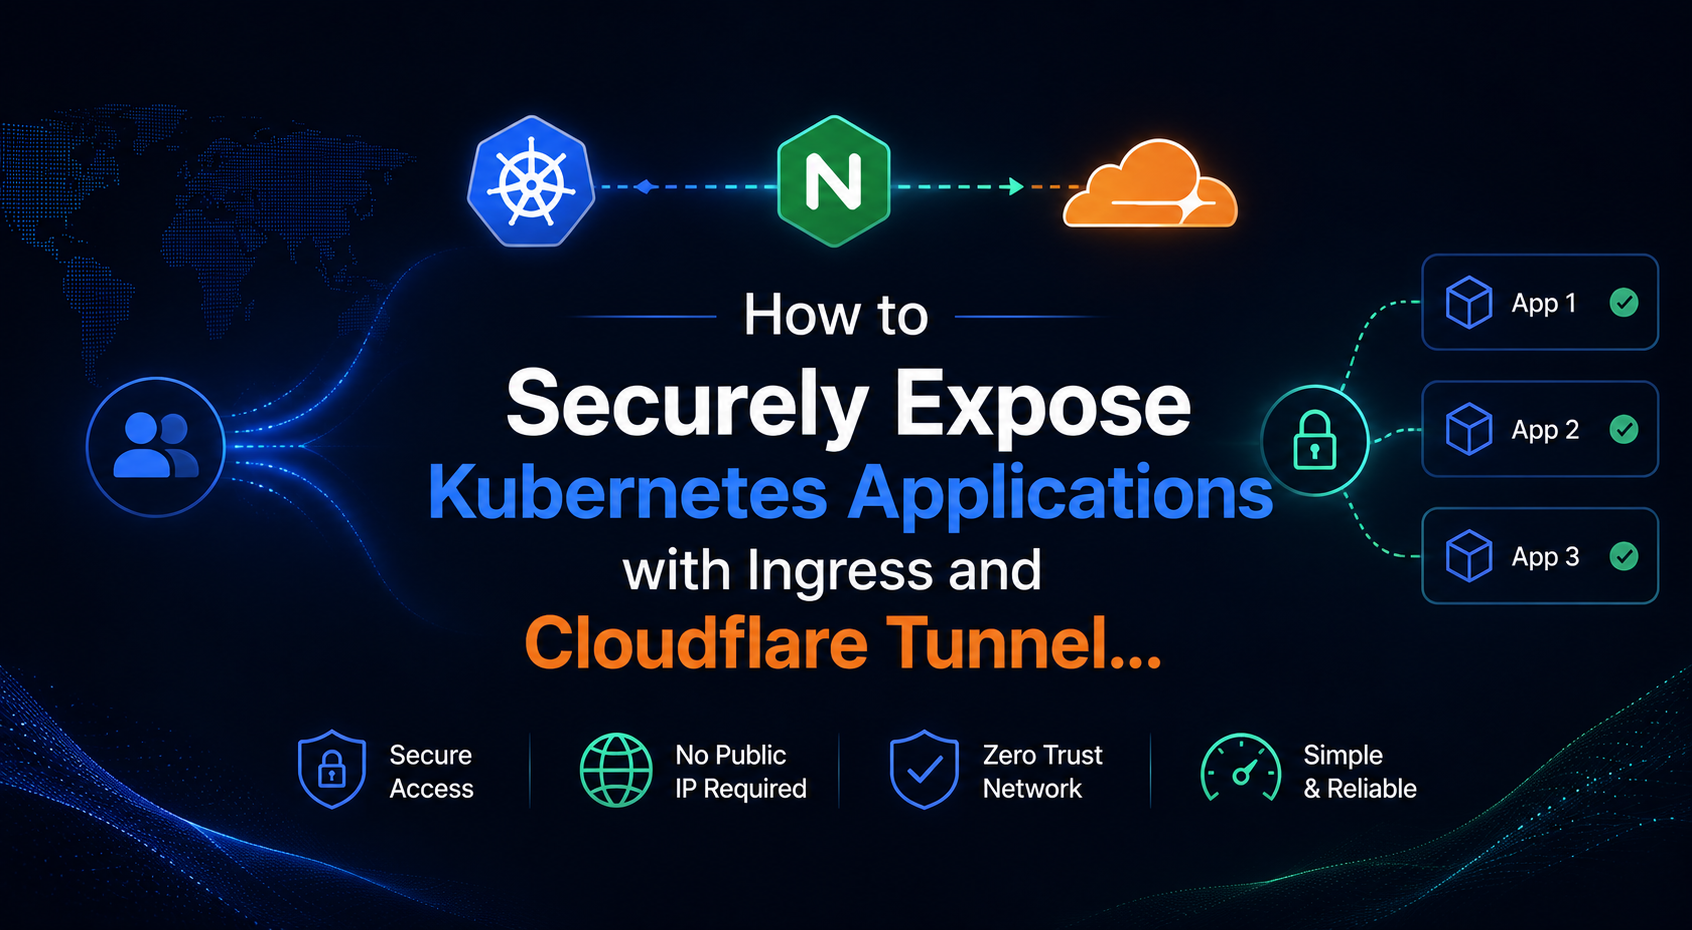
Modern applications are expected to be accessible beyond local environments and capable of handling real-world usage scenarios. Achieving this requires more than just running an application. Additionally, it involves proper configuration management, efficient request routing, and secure exposure to external users. Kubernetes Ingress Cloudflare Tunnel plays an important role in enabling secure external access.
To expose Kubernetes applications with Ingress and Cloudflare Tunnel, these principles are applied to securely make the application publicly accessible.
The implementation includes:
- Kubernetes with Minikube for container orchestration
- ConfigMap for externalized configuration
- Service and Ingress for internal routing
- Cloudflare Tunnel for secure external access
Together, these components show how real-world systems are structured and exposed.
Scope of Implementation
In this guide, you will learn how to expose Kubernetes applications with Ingress and Cloudflare Tunnel in a structured and practical way.
- Containerizing and deploying an application using Kubernetes (Minikube)
- Managing configuration using ConfigMap
- Understanding the roles of Service and Ingress in networking
- Identifying limitations of NodePort in real-world scenarios
- Enabling secure external access using Cloudflare Tunnel
- Understanding end-to-end request flow within Kubernetes
Application Overview
To demonstrate this setup, we use a lightweight Task Management web application built using Flask.
Core Features:
- Create and manage tasks
- Assign roles (Manager / Developer / QA)
- Track task status (To-Do, In Progress, Done)
- Control application behavior via environment variables
This design makes it ideal for demonstrating configuration management and deployment patterns.
Environment Setup
Before you begin, ensure the following tools are installed:
- Docker
- Minikube
- kubectl
Start your Kubernetes cluster:
minikube startConfiguration-Driven Approach
The application is designed to be configuration-driven, leveraging environment variables such as:
**APP_TITLE****ENV****MAX_TASKS****ENABLE_DELETE**
This approach allows you to change behavior without modifying code or rebuilding images. As a result, it supports flexible configuration.

Code snippet demonstrating environment variable usage
Containerizing the Application
Before deploying to Kubernetes, containerize the application using Docker.
In this project, the application source code is organized inside a folder named **task-app**:
filecollection/ ├── kubernetes/ └── task-app/ ├── app.py ├── Dockerfile ├── requirements.txt └── templates/The Dockerfile exists inside the task-app directory. Therefore, you must navigate to this folder before building the image.
Dockerfile
The following Dockerfile is used to containerize the Flask application:
# use Python base image
FROM python:3.9
# set working directory
WORKDIR /app
# copy application files
COPY . .
# install dependencies
RUN pip install -r requirements.txt
# run the application
CMD ["python", "app.py"]
Build the Docker image
Step 1: Navigate to Application Directory
cd task-appStep 2: Build Docker Image in Minikube Environment
eval $(minikube docker-env)docker build -t task-app .Build Context and Environment Setup :
docker build -t task-app .builds the image using the Dockerfile in the current directory.(dot) represents the build context (all files in the folder)eval $(minikube docker-env)ensures the image is built inside Minikube’s Docker environment, so Kubernetes can use it directly without pushing to an external registry
Note: This Dockerfile is intentionally kept simple to focus on Kubernetes deployment and networking concepts. In production environments, additional optimizations such as lightweight images and process managers can be applied.

Successful Docker build output
Kubernetes Deployment
To run the application inside Kubernetes, use a Deployment resource. It defines how the application container should be created and managed.
The application follows a configuration-driven approach, where configuration is stored in **kubernetes/deployment.yaml** and exposed to the container through ConfigMap as a mounted file.
Deployment Configuration
apiVersion: apps/v1
kind: Deployment
metadata:
 name: task-app
spec:
 replicas: 1
 selector:
   matchLabels:
     app: task-app
 template:
   metadata:
     labels:
       app: task-app
   spec:
     containers:
       - name: task-app
         image: task-app
         imagePullPolicy: Never # imp for docker local
         ports:
           - containerPort: 5000
Deploy the application:
kubectl apply -f deployment.yamlkubectl get podsKubernetes now runs the application inside Pods. Additionally, each Pod provides isolation and scalability.
Pods in Running state
Externalizing Configuration with ConfigMap
Kubernetes ConfigMap allows configuration to be managed outside the application code, enabling flexible and environment-specific settings without rebuilding the image.
ConfigMap Definition
This setup uses ConfigMap as a volume-mounted file instead of environment variables.
apiVersion: v1
kind: ConfigMap
metadata:
  name: task-config
data:
  app.properties: |
    APP_TITLE=Project Task Manager
    ENV=Production
    MAX_TASKS=10
    ENABLE_DELETE=true
Mounting Configuration as a Volume
To make this configuration available inside the application, the ConfigMap is mounted as a volume through the Deployment configuration (deployment.yaml).
 volumeMounts:
    - name: config-volume
      mountPath: /etc/config
      volumes:
        - name: config-volume
          configMap:
            name: task-config
Inside the container:
Kubernetes exposes the ConfigMap as a file at /etc/config/app.properties.This allows the application to read configuration values directly at runtime.

Mounted configuration file inside pod
Verifying ConfigMap Updates (Important Behavior)
After updating the ConfigMap, verify the changes using the following steps:
kubectl edit configmap task-configVerify inside the Pod:
kubectl exec -it <pod-name> -- cat /etc/config/app.propertiesObservation
- The file inside the container updates immediately
- Refreshing the browser reflects changes in the UI
- No pod restart was required
Explanation: Since Kubernetes mounts the ConfigMap as a volume, it updates the file dynamically. As a result, the application reads configuration directly from the mounted file, so changes reflect without restarting the pod. However, this behavior depends on how the application reads the configuration.
Service: Enabling Internal Communication
Once the application runs inside Pods, you cannot access it directly. Therefore, Kubernetes uses a Service to provide a stable internal endpoint.
Pods are dynamic and can restart, so their IP addresses change. As a result, direct access becomes unreliable. A Service solves this problem by providing a consistent endpoint for communication. The Service uses the ClusterIP type, which works as the foundation for Ingress routing. Additionally, it keeps communication secure by allowing access only within the cluster.
You can find the Service definition in kubernetes/service.yaml
Service Configuration
apiVersion: v1kind: Servicemetadata: name: task-app-servicespec: type: ClusterIP selector: app: task-app ports: - port: 5000 targetPort: 5000Why This is Needed
- Pods are dynamic and can restart, causing IP changes
- Direct access to Pods is unreliable
- Service provides a stable endpoint (
task-app-service) - Ensures stable communication inside the cluster
Why ClusterIP
- Works as the base for Ingress routing
- Default Service type in Kubernetes
- Accessible only within the cluster
- Provides a secure internal communication layer
Ingress: External Routing without exposing ports
However, while the Service allows internal access, it cannot be accessed from outside. To handle external HTTP traffic in a clean way, create an Ingress resource.
You can find the configuration in kubernetes/ingress.yaml.
Ingress Configuration
apiVersion: networking.k8s.io/v1
kind: Ingress
metadata:
  name: task-app-ingress
spec:
  rules:
    - host: task-app.local
      http:
        paths:
          - path: /
            pathType: Prefix
            backend:
              service:
                name: task-app-service
                port:
                  number: 5000
What Ingress Actually Does
Ingress acts as a routing layer. Moreover, it directs incoming traffic to the correct Service.
- Receives incoming HTTP requests
- Checks the host name (
task-app.local) - Forwards traffic to
task-app-service - Service then routes to the correct Pod

kubectl get ingress
Learn more about Ingress configuration: https://kubernetes.io/docs/concepts/services-networking/ingress/
Identifying the Limitation
Although Ingress improves routing within the cluster, the application is still not accessible externally. This is due to typical limitations of local Kubernetes environments such as Minikube:
- The application is restricted to the local system
- Access requires manual host file configuration
- It cannot be shared across external networks
These constraints highlight the need for a secure and practical method to expose the application beyond the local environment.
Enabling External Access with Cloudflare Tunnel
To overcome these limitations, Cloudflare Tunnel securely exposes the application to the internet.
Advantages of this approach
- No need for a public IP address
- No firewall or port forwarding configuration required
- Creates a secure outbound connection
This setup helps to expose Kubernetes applications with Ingress without directly exposing ports or requiring complex network configurations.
Cloudflare Authentication
Before creating a tunnel, authentication is required:
cloudflared tunnel loginThis step opens a browser window where you log in and authorize access. Once completed, your local environment is securely connected to your Cloudflare account.
Integrating Tunnel with Ingress
To expose the application externally in a structured way, the tunnel is connected directly to the Ingress endpoint instead of using port forwarding.
cloudflared tunnel \ --url http://192.168.49.2 \ --http-host-header task-app.localThis approach ensures that external traffic follows the complete Kubernetes routing flow through Ingress and Service instead of bypassing it.
Why This Approach works:
- More aligned with real-world deployment practices
- Connects external traffic directly to Kubernetes Ingress
- Preserves the full request flow (Ingress → Service → Pod)
- Avoids dependency on port forwarding
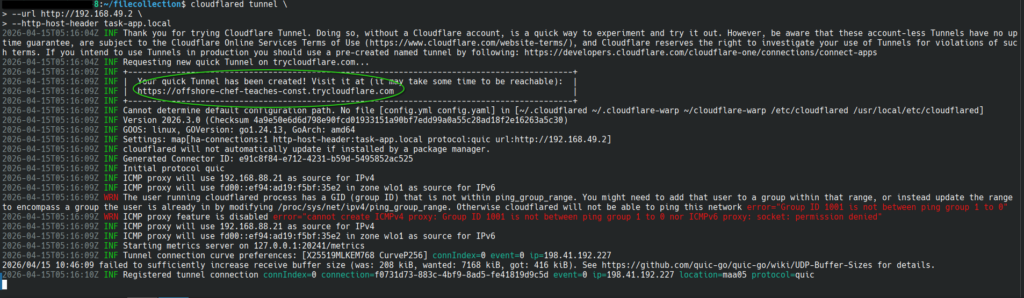
Public URL generated
Final Result
Once the tunnel is active, Cloudflare generates a temporary public URL, and as a result, the application becomes publicly accessible.
Your application is now accessible globally:
example: https://xxxxx.trycloudflare.com
https://offshore-chef-teaches-const.trycloudflare.com/
It can be accessed from:
- External systems
- Mobile devices
- Any internet-enabled environment

Application accessed externally
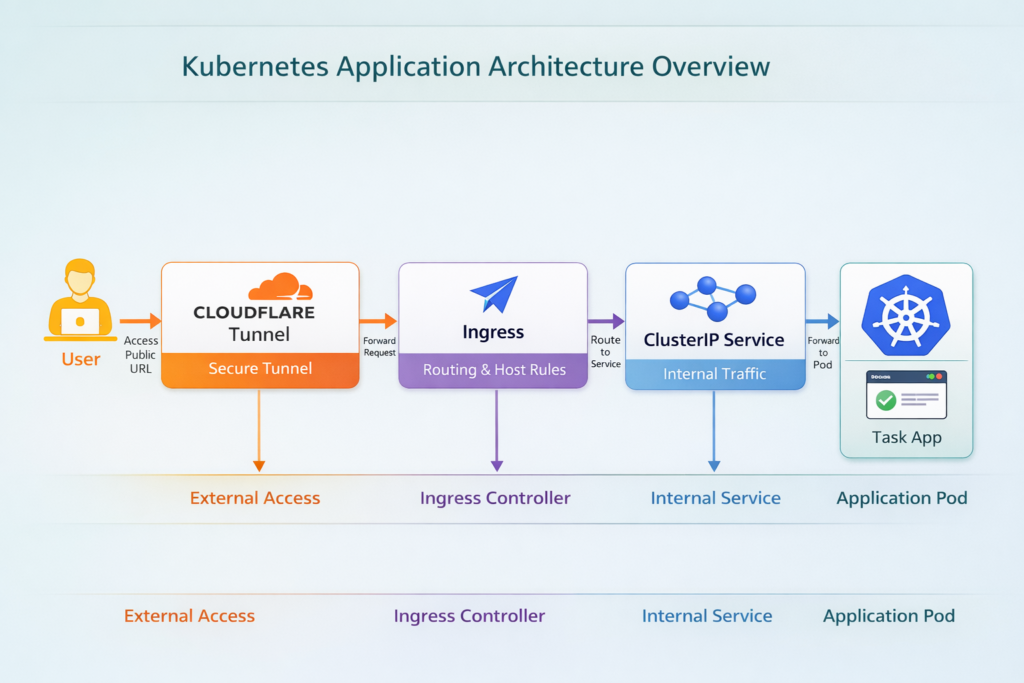
Bringing It All Together
End-to-End Request Flow
The diagram shows how user requests flow through the system. Then, each component processes the request step by step.
When a user accesses the public URL, Cloudflare Tunnel receives the request and then forwards it to the Kubernetes cluster. Next, Ingress routes the request to the Service, which directs it to the appropriate Pod. Finally, the application processes the request and returns the response.
Real-World Perspective
This setup closely mirrors production-grade architecture:
- Ingress acts as a routing layer (similar to API gateways)
- Services handle internal communication between components
- ConfigMap enables flexible configuration management
- Cloudflare Tunnel provides secure external exposure without infrastructure complexity
Such patterns are widely used in modern DevOps and cloud-native applications.
Conclusion
This setup shows how a simple local application can be transformed into a structured and externally accessible system using Kubernetes. By integrating configuration management, internal networking, and secure exposure through Cloudflare Tunnel, we move closer to real-world deployment practices. This approach not only improves accessibility but also establishes a strong foundation for scalability and future enhancements in cloud-native environments.
References
- Kubernetes – ConfigMap (Volume Mount)
https://kubernetes.io/docs/concepts/configuration/configmap/ - Docker – Image Build Documentation
https://docs.docker.com/engine/reference/commandline/build/ - Cloudflare Tunnel Documentation
https://developers.cloudflare.com/cloudflare-one/connections/connect-apps/